When we bought our home, we knew the kitchen would be one of the first spaces we tackled. It was functional but far from inspiring – small, dark, and tucked into the least practical corner of an open-plan space. The kitchen felt like an afterthought, with its outdated cabinets and inefficient layout. But for a pair who love hosting, cooking, and creating a home filled with warmth, it was clear that this room needed a complete transformation.
We wanted more than just a functional kitchen; we dreamed of a space that reflected the charm of English cottage interiors while offering the practicality of modern design. This is the story of how we turned our cramped kitchen into the heart of our home.
Assessing the Challenges of a Small Kitchen


The original kitchen was part of an awkward open-plan layout, which opened into a dining and living area. However, it wasn’t ideal for entertaining or everyday use. There was no room for a proper dining table, and the living space felt cramped and dark in a corner. The kitchen itself lacked flow, making it hard for more than one person to cook or prep at a time.
Adding to the frustration, the space didn’t take advantage of the south-facing garden, one of the home’s best features. With no visual or physical connection to the outdoors, the layout felt stifled, especially during summer when we love to host barbecues and enjoy indoor-outdoor living.
Reimagining the Space: A Kitchen That Works


To make the kitchen more functional and inviting, we had to rethink the entire layout of the home. One of our biggest decisions was to move the living room into a planned extension, which gave us the freedom to redesign the current space into a large, L-shaped kitchen and dining area. This reconfiguration created:
- Defined Spaces: We’re not big fans of open-plan living, especially in the UK, where such layouts can feel cold. Dedicated rooms give our home a cosy, welcoming vibe.
- Better Garden Access: By relocating the kitchen closer to the garden, we opened up opportunities for indoor-outdoor living, ideal for summer hosting.
- Improved Flow: The L-shape allowed us to optimise the layout for cooking and entertaining, with a clear division between the kitchen and dining areas.

Bringing the Vision to Life: Kitchen Design in CAD
As part of our planning process, we relied heavily on detailed CAD (Computer-Aided Design) drawings to visualize and refine the new kitchen layout. These drawings were instrumental in translating our ideas into a tangible plan, allowing us to experiment with different configurations and ensure every element worked together harmoniously.
The CAD drawings highlight:
- Optimized Workflow: The relationship between key areas like the sink, range, and fridge for effortless cooking and entertaining.
- Defined Zones: Clear separation between the kitchen and dining areas, enhancing both functionality and aesthetics.
- Storage Solutions: The placement of tall cabinets and base units to balance practical needs with a symmetrical design.
Below are some of the CAD renderings that showcase the layout and design features of our new kitchen. These visual plans were a crucial step in bringing our vision to life, offering a glimpse of how the space would look and function before any construction began.


Designing a Functional Layout
Practicality was our top priority as we designed the kitchen layout. While we wanted a space that looked beautiful, we also needed it to work seamlessly for cooking and hosting. Here’s how we tackled it:
- Keeping Plumbing Simple: We kept the sink on the same external wall to avoid costly plumbing changes, extending the pipes to fit the new layout.
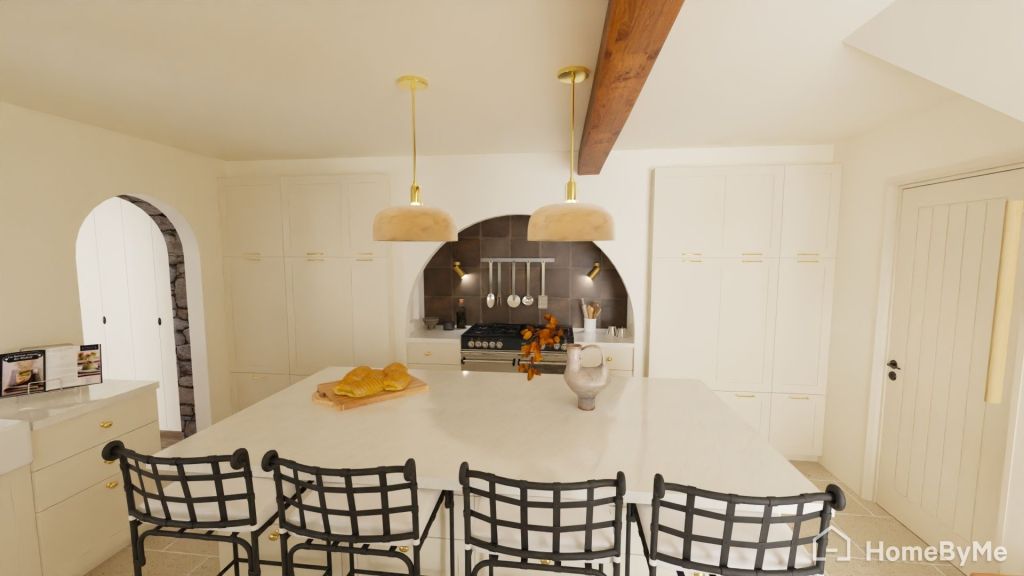
- Strategic Storage: To frame the range as the focal point, we added symmetrical tall cabinets for the boiler, pantry, and fridge-freezer. This provided plenty of storage while maintaining a balanced design.
- Optimising Workflow: We carefully planned the “kitchen working triangle” – the relationship between the sink, range, and fridge. The sink stayed under the window for natural light, flanked by a dishwasher and bin. The fridge was placed on the opposite side of the kitchen for easy access without interrupting the cooking flow.
For now, we’ve placed a large farmhouse table in the center of the space, which adds to the English cottage aesthetic. In the future, we hope to install a kitchen island with seating, additional storage, and a secondary bin for even more functionality.
Embracing a Neutral Palette and English Cottage Aesthetic


When it came to aesthetics, we wanted a space that felt timeless and completed the charm of our stone bungalow in the English countryside. Our design philosophy was simple: interiors should either complement a home’s architecture or create a bold contrast. For this project, we chose to lean into the home’s natural character. This meant focusing on a design that blended classic elements with a modern touch.
Design Inspiration:
- Neutral, Earthy Palette: We opted for a calming palette of warm creams, beiges, and earthy tones. This choice allowed the materials and design elements, like natural stone and wood, to take center stage without competing for attention.
- Historical Influence: Victorian, Georgian, and traditional English country kitchens often featured neutral backdrops. These tones served as a timeless canvas, allowing kitchens to feel cohesive and adaptable to changing trends.
- Connection to Nature: Our home is nestled near the Saddleworth Moors, with its sweeping, natural landscape of soft, muted tones. We wanted the kitchen to reflect these surroundings, creating harmony between the interior and exterior of the house.
- Natural Materials: Natural materials like wood, stone, and brass felt like the perfect choices to reflect the warmth and character of English countryside homes.
The First Steps: Demolition and Planning

The transformation began with tearing down the old kitchen. It was a chaotic yet rewarding process, as we uncovered hidden challenges (like an exposed boiler) and removed a small vestibule blocking the front door. Knocking down the vestibule instantly flooded the space with light and gave us a glimpse of the potential we were working toward.
At the same time, we began planning the new kitchen in earnest. After months of research, we chose DIY kitchens for their quality, budget-friendly options, and excellent service. Their online design tool allowed us to plan every detail, and their showroom visits helped confirm our choices. We selected cabinets in a shaker style with a greige finish called ‘Mussel’. The balance of classic design with modern practicality felt perfect for the space. The durable wood carcasses with MDF doors provided the best of both worlds – longevity and affordability.

With Christmas fast approaching, we pushed through plastering and first-fit electrics to get the space ready for the next phase.
Looking Ahead
By the end of this stage, the space was a blank slate, ready to be transformed into a functional stylish kitchen. In the next post, I’ll share how we tackled the challenges of installation, from fitting cabinets to installing underfloor heating. I’ll also highlight the personal touches – like unlacquered brass hardware and antique pendant lights – that began to bring our vision to life.
If you’re planning your own renovation or love the timeless charm of English cottage kitchens, stay tuned for the next installment!
JG x


Leave a comment